Table management and order tracking in the admin area
Before taking orders, you can add and organize your tables in the “Table” section of the menu in the left-hand column.
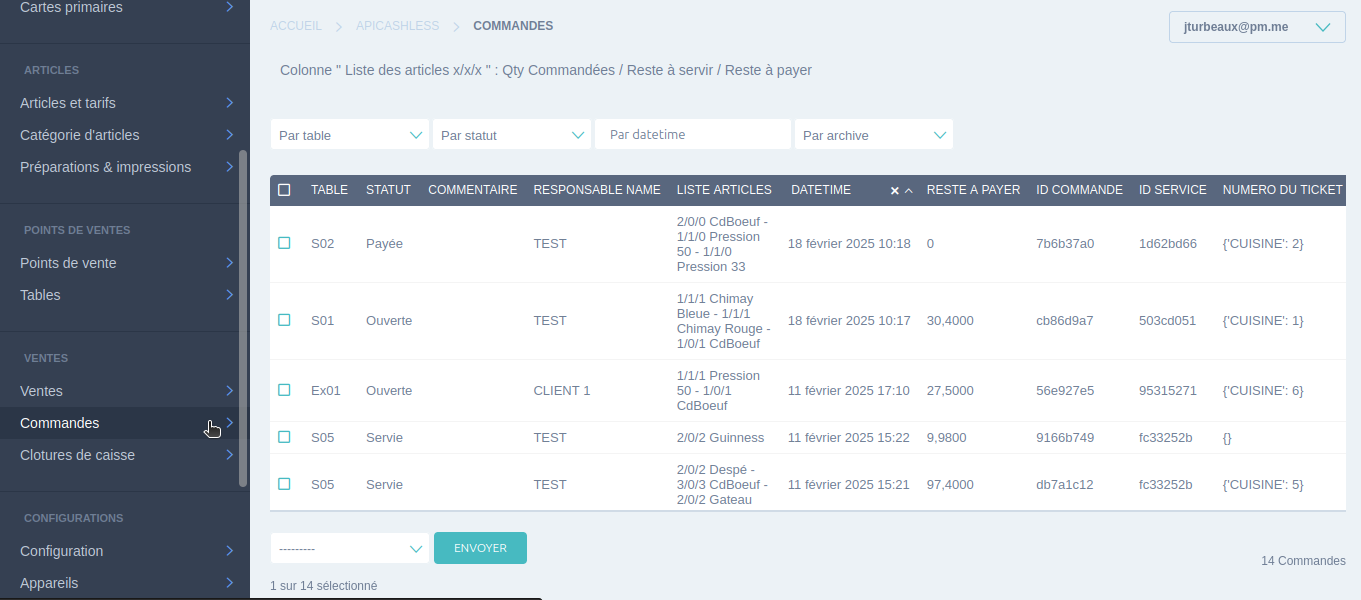
Once you've placed an order, you'll be able to find it in the “Orders” section, along with all the relevant information:
- Table name (e.g. Table 1, Ext 1)
- Order status (paid, served, pending...)
- Name of person responsible for order
- List of items ordered
- Order date
- Amount still to pay (if applicable)
- Order identifier (Order ID)
- Service identifier (Service ID)
- Ticket number
This gives you an overview and helps you track the status of orders in progress.
Add a table
If you need to add a table, follow these steps:
-
Go to the “Table” menu in the left-hand column.
-
Click on “Add table” in the top right-hand corner.
-
Assign a name to the table (e.g. Table 1, Terrace 2).
-
Associate it with a category, if necessary.
-
Define its status:
- Free: if the table is available.
- Occupied: if a customer has just set up.
-
Additional option:
- Ephemeral table: Check “Ephemeral” if the table is temporary (e.g. added for a group of customers).
- Archive: Archive the table if it is no longer in use.
Once saved, the table will be available in the order management interface.
Order management on the cash register
Once you've set up your tables, you can start taking orders directly from your cash register or phone.
Steps to take an order :
- Access the “Point of sale” menu in the top right-hand corner.
- Select the outlet where your menu is located (e.g. Resto).
- Choose your service mode:
- Direct service: the order is taken and paid for immediately.
- Order with shipment in preparation: directly select the occupied table.
- Add products ordered.
- Confirm total.
- Choose a shipping option:
- Send to preparation: the order is sent to the kitchen/bar.
- Send in preparation and pay in one go.
- Send in preparation and go to the payment page (convenient for separate payment).
This enables smooth order management and efficient preparation tracking.
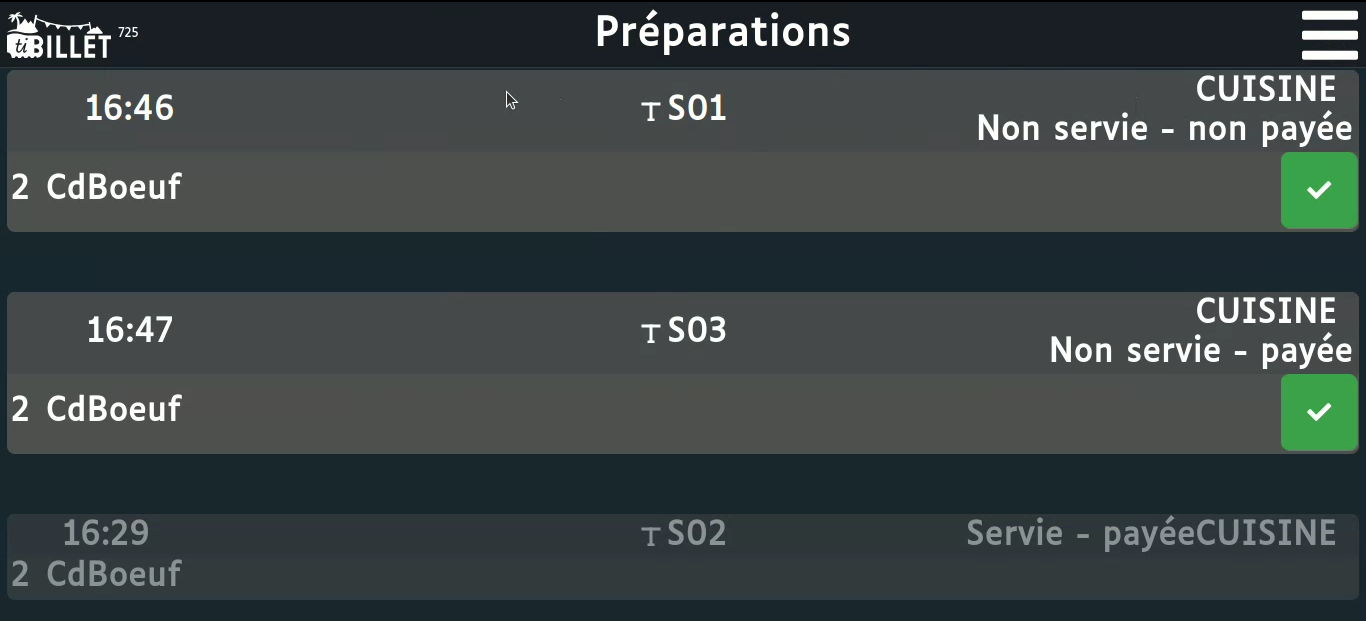
Tables and preparations
🔴 Table in red: What does it mean?
When a table appears in red, it indicates that:
- The order has not been paid for **.
- The order has not yet been served** Or both.
- or both.
**How to check order status?
- Go to “Preparations ” (top right menu).
- Check the status of each order, where you'll see :
- ✅ “Served” or “Not served ”.
- 💰 “Paid” or “Unpaid ”.
Update order status If the order has been served, you'll see the status of the order.
- If the order has been served, click on the validation button to indicate this.
- The table will remain red until payment has been made.
Direct service mode
During an event, the “Direct Service” mode is recommended. It allows you to :
- Take orders and cash in immediately.
- Simplify and speed up service.
- Avoid waiting orders on a table.
🔹 How do I activate it? Before selecting a table, select “Service Direct” before choosing items. Once the order has been validated, payment will be requested immediately.